

Unit Coordinator & Lecturer
Dr. Naeha Sharif
Lab Facilitators
David Charkey
Jasper Paterson
Consultation Time
Thursdays, 3:00-4:00pm.Where: Room 1.05 in CSSE
and online (active in consultation hour)
News:
- [28 Feb'22] Welcome to CITS3003
More Rotation and Simple 3D
Objectives:
In this lab's exercises, you will extend lab 2 by:- Efficiently rotating many points.
- Extending 2D rotation to other transformations like scaling
- Extending 2D rotation to 3D with a simple 3D orthographic projection.
Try to complete this lab during the lab session and, if
you fall behind, complete it in
your own time.
Continuing from last time
- Check the sample solutions for lab 2.
- Copy your
lab2folder tolab3 - Remove the cpp files for the lab 2 questions
from the new
lab3folder - but still go back and read the code in the lab 2 and lab 1 folders as needed. You can even copy code fragments over to this weeks code.
Q1: You don't have to be square to rotate
- This lab has less detailed instructions than labs 1 and 2. However, you should be able to complete this lab using what you learnt from the previous two.
- Combine the rotation code from the end of the last lab with the code from lab 1 q1circle.cpp to make the points rotate. Make it and run it.
- Comment out the code you added that removes points outside the circle, make and run again. What happens to points that end up outside the window when rotated?
- Increase the number of points. How many can we have and still see smooth rotation?
An example of really a lot of points:

Q2: Generalising in 2D
- Calculating sin and cos of the angle again for each vertex is wasteful, since these
are actually the same for all vertices in a particular call
to
glDrawArrays. Take a copy of the code (C++ and GLSL) for Q1 and change it so that, instead of the uniform variabletime, the sin and cos of the angle are calculated in the C++ program and passed asuniform floatvariablessinAngleandcosAngleto the vertex shader.Make and run this program. (You may not actually see much difference in performance, but it's generally good to avoid recalculating things, and this change is also a step towards the general approach to transformations in OpenGL via matrices.)
- Now, our shader is actually more general than before, e.g., it can now perform scaling as well as rotation: just multiply the sin and cos values by (say) 0.5 or 2.0 when setting the uniform variables.
- What happens if we use different scales for the two values? What happens if we use double the angle for the sin value without changing the cos value? Why? (Make copies for these versions.)
- Remember from last time:
costells you how much the original (x or y) coordinate affects the same coordinate when rotated.
sintells you how much the original (x or y) coordinate affects the other coordinate when rotated. (It's negative in the line for the x coordinate above because the y-axis when rotated clockwise moves towards the negative x-direction.)
Suppose we want to separately say how much x affects x, x affects y, y affects x and y affects y. Then we'll have 4 separate numbers - arrange these in a 2 by 2 matrix and pass them to the shader instead of the sin and cos values. (Start with a copy of your code prior to experimenting with scaling.)
Hint: you can construct and pass the 2 by 2 matrix via:
  mat2 multipliers_mat = mat2( vec2(cos(angle), -sin(angle)),
                               vec2(sin(angle),  cos(angle))  );

  glUniformMatrix2fv( multipliers, 1, GL_TRUE, multipliers_mat );
This requires that
multipliersbe a global variable set viaglGetUniformLocationduring initialisation to link to auniform mat2variable in the vertex shader which replacessinAngleandcosAngle.Similarly, replace the uses of
sinAngleandcosAnglewith:-
multipliers[0][0]for the x multiplier affecting the x coordinate, -
multipliers[0][1]for the y multiplier affecting the x coordinate (replacing also the -ve since instead it's in the matrix), -
multipliers[1][0]for the x multiplier affecting the y coordinate, -
multipliers[1][1]for the y multiplier affecting the y coordinate,
-
- The code you have that calculates the x and y coordinates in the vertex shader should in fact be
the same as performing the matrix multiplication:
multipliers *vPosition.xy. Verify that the code works the same when you put the following in the vertex shader:
gl_Position.xy = multipliers * vPosition.xy;
- What happens now if you scale up just the multipliers that affect the x coordinate?
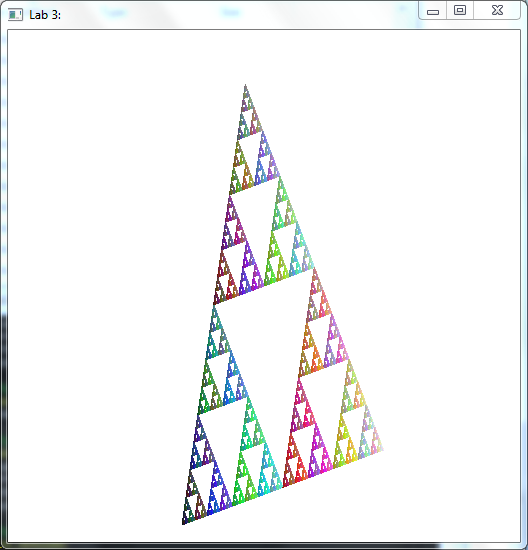
- Optional: add some color to the points. Preferably in a way that somehow reflects their structure.
Example image with different scaling for the multipliers affecting the x and y coordinates. (And optional colour.):
- Calculating sin and cos of the angle again for each vertex is wasteful, since these
are actually the same for all vertices in a particular call
to
Q3: Rotating in other dimensions
- Make a copy and modify the previous rotation code (C++ and vertex shader) so that
instead of rotating the x and y coordinates, it rotates the y and z coordinates.
Make it and run it - does it give what you expect?
Hint: the x coordinates should stay constant, and the y and z coordinates should rotate in the same way as the x and y coordiantes did in the previous parts.
Note: the z coordinate will actually have no effect, for now, but later it will when we also do hidden surface removal and perspective projection.
Without perspective projection (we have an orthographic projection), it means that far objects occupy just as much of the screen as close ones. This gives a less realistic 3D effect, although it does accurately model the situation where the viewer is distant relative to the size of the objects, and orthographic projections are generally prefered for technical drawing in engineering and architecture.
- Do similarly for rotating in the x and z coordinates.
- Generalize the previous 2 by 2 matrix to a 3 by 3 matrix to perform the same rotations
as above.
Hint: The z-coordinates passed to the vertex shader should always be zero.Hint: The coordinate that isn't being rotated should have 1 in the matrix for its effect on itself, and zeros for the effects on itself by the other coordinates, as well as zeros for its effects on the other coordinates. For the coordinates that are being rotated it should do similarly to the 2D rotations above.
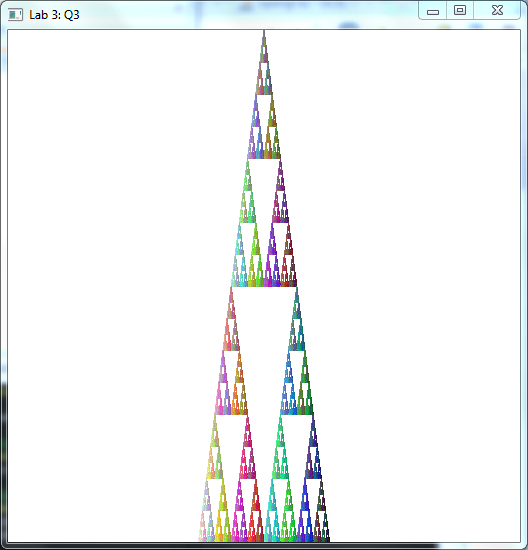
- Make a copy and modify the previous rotation code (C++ and vertex shader) so that
instead of rotating the x and y coordinates, it rotates the y and z coordinates.
Make it and run it - does it give what you expect?
Sample Solutions
All files at once:
lab3-soln.zip
Unzip this so that you have lab3-soln
under your labs-examples folder, then build using make as usual.
Department of Computer Science and Software Engineering
University information
CRICOS Code: 00126G
This Page
Website Feedback:
naeha(dot)sharif(at)uwa(dot)edu(dot)au