
|
|
CITS2002 Systems Programming |
|
|
Linux and C compiler basicsTo access Linux in CSSE Lab 2.03, start by logging in using your UWA ID and password. Logging into Linux at its console (via a physical keyboard and monitor, rather than over a network connection) will invoke a standard Linux graphical user interface (GUI). If accessing Linux on your own computer you will, of course, need to login using your locally created username and password.
Beyond the GUI: getting closer to the underlying operating systemNow that we've at least seen the Linux GUI, let's have a look at what's going on behind the scenes. Underlying the graphical interface is an open source Unix-inspired operating system. This provides you with a lot of extra power and access to a huge range of open source software. In fact, many of the applications shipped with commercial operating systems, such as Windows or Apple's macOS, use open source projects, and 'started life' on Linux. Linux is also the platform of choice for many commercial applications, supercomputer installations, most cloud platforms, and mobile devices. There are times when you want more control than the GUI applications provide, or when it is simply faster or more convenient to access the underlying operating system directly. In this section, we will introduce some basic Linux commands to give you a flavour of using Linux directly, rather than just through a GUI. For more detail, there are many Linux introductions available on the web, such as Sections 17.1 and 17.2 of Appendix 2 of Dive Into Systems If you have used a Unix-inspired operating system before, for example the Linux operating system available in the CSSE labs, then you should be able to skip through this section quite quickly. If you haven't, then you may find this introduction useful, but with a steep learning curve.
Getting StartedTo access the operating system through a command-line interface, invoke a program named term or xterm on Linux (or Terminal or iTerm2 on macOS). This will open up a terminal window (a viewport) containing an operating system shell process 'running behind it'. Keyboard presses pass 'through' the terminal window to be consumed by the term program, and output from term or any programs that it invokes are directed 'back' through the window. Being a standard GUI window, you may use its scrollbars to review past output (without re-running the commands which produced it). In the following examples we will assume your shell prompt will be represented by the text prompt>, although it is probably different depending on the computer you have logged into. You can later tailor the prompt, as many people do, to indicate the current directory and command number being entered. When entering the examples below, don't type the prompt, just what follows it. Anything you type into the terminal after the prompt will be interpreted as a command. The prompt indicates that the terminal is expecting you to type in a command, after which it will respond with the output (if any) and then another prompt to signify that it is waiting for the next command. Try typing the command date at your prompt and see what happens: prompt> date Thu Jul 27 15:41:59 AWST 2023 prompt> You should have observed that the shell has executed your command by printing the current date on the screen. Immediately following the date, the shell has printed another prompt, indicating it is again ready for user input. This "prompt-command-prompt" style of interface is sometimes termed a command-line interface to distinguish it from more modern graphical user interfaces (GUIs). It is also often termed a "read-eval-print-loop" (REPL), and will be familiar to interactive Python programmers. In the past, Unix programmers did all their work using just a single command-line and therefore became very adept at using Unix's sometimes less than intuitive abbreviated commands. Current windowing environments allow people to work far more efficiently, offering the ability to open multiple terminal windows at the same time. Try: prompt> whoami 20000001 which will return your user "name", with which you logged in. On Linux in CSSE Lab 2.03 this is your UWA student number; on your own computer it's likely to be your name. In the following examples, try all the commands yourself as you read through this sheet.
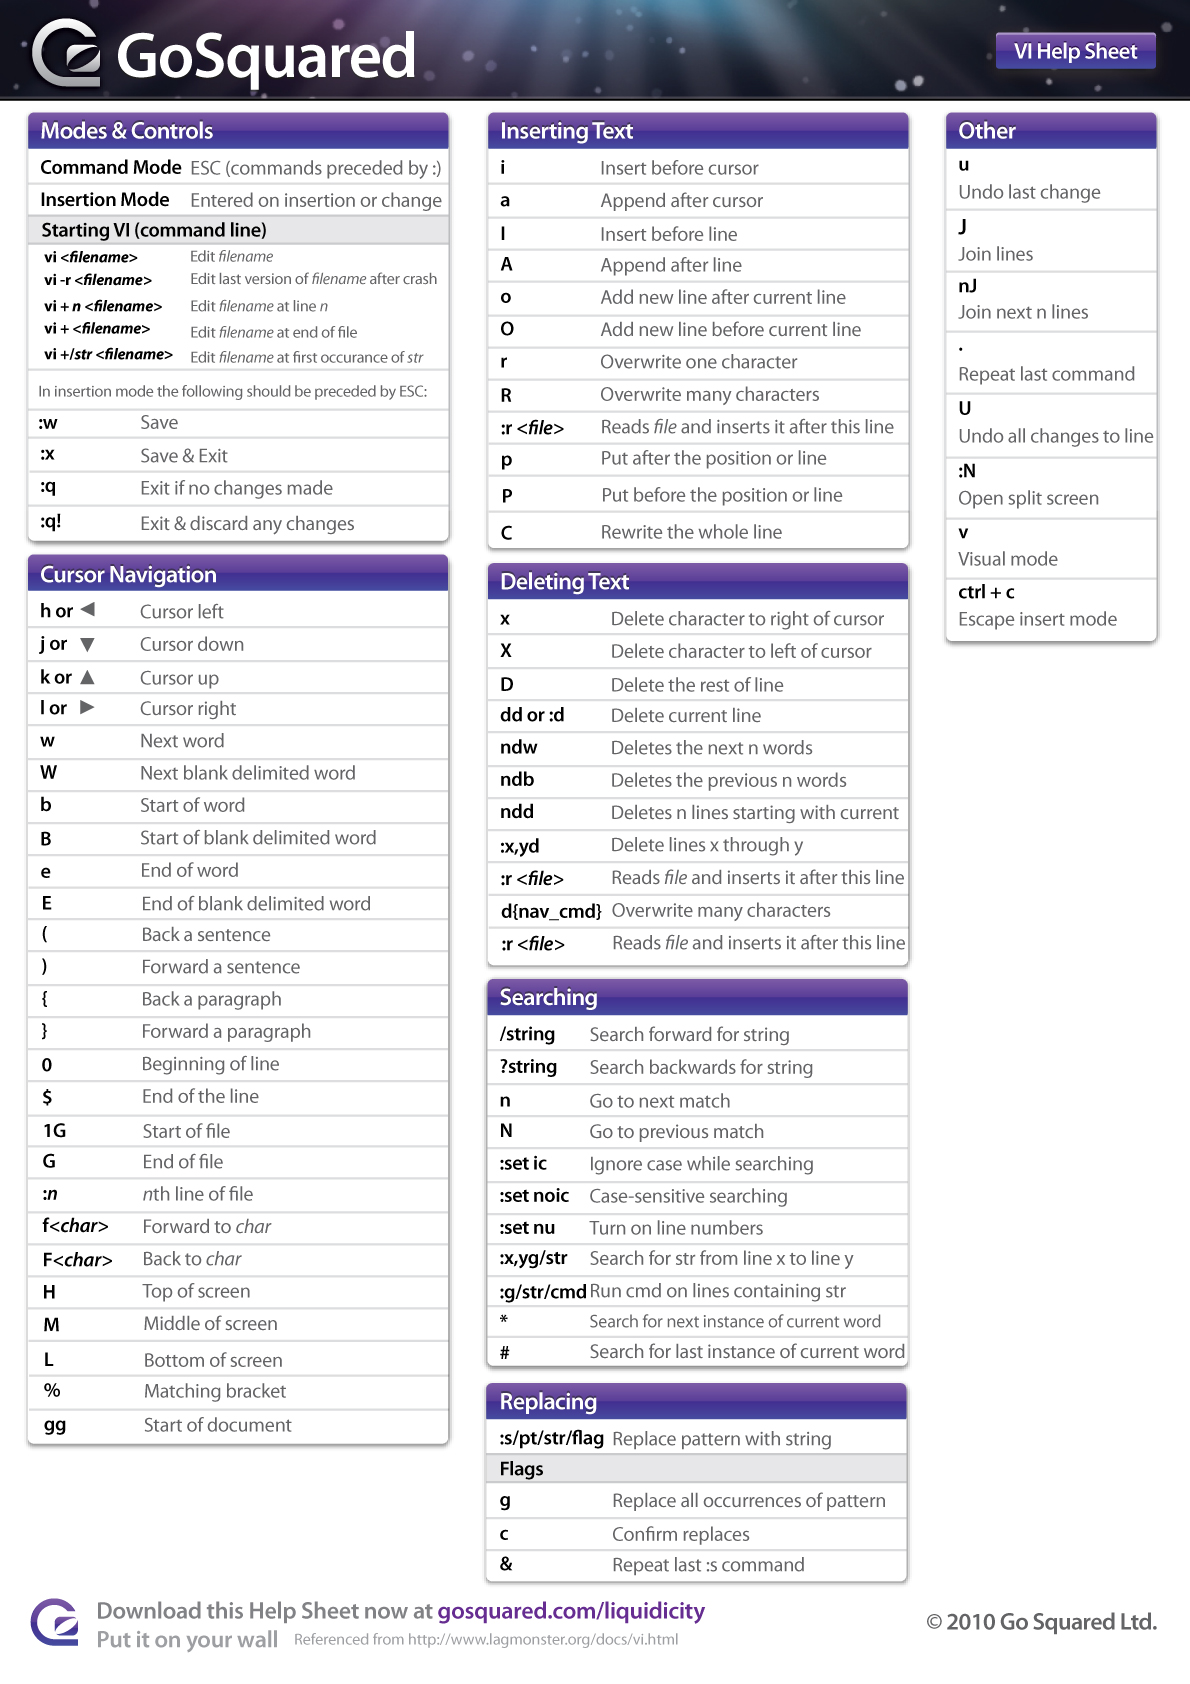
Running ProgramsTo run commands you simply type their name at the command prompt. Try: prompt> cal July 2023 Su Mo Tu We Th Fr Sa 1 2 3 4 5 6 7 8 9 10 11 12 13 14 15 16 17 18 19 20 21 22 23 24 25 26 27 28 29 30 31 which displays a calendar for the current month. Most commands can be modified by giving either arguments or options (or switches) to the command. You can think of arguments as being input data. For example, as we just saw the cal command on its own gives the calendar for the current month. You can specify exactly which month you want by giving some additional arguments. For example: prompt> cal 8 2023 gives the calendar for August 2023. Here the 8 and the 2023 are the arguments to the cal command. Options are a special kind of argument that specifies a variation in the way that the command operates. For example, the date command has an option to present the time in Coordinated Universal Time (UTC). That is, prompt> date -u gives the time and date in UTC. The -u is an option to the date command. Many Unix commands have a bewildering variety of arguments and options, which are often subtly (or sometimes blatantly) different between different implementations of Unix. Even experienced Unix users often cannot remember all the options for all the commands that they use. Fortunately there is help available in the form of the on-line manual. The command man can be used on Unix systems to find out the details of the arguments and options for the other commands. For example: prompt> man cal CAL(1) BSD General Commands Manual CAL(1) NAME cal - displays a calendar SYNOPSIS cal [-smjy13] [[[day] month] year] DESCRIPTION Cal displays a simple calendar. If arguments are not specified, the cur- rent month is displayed. The options are as follows: -1 Display single month output. (This is the default.) -3 Display prev/current/next month output. ... The manual page (man page) tells you what the command does and explains the various arguments and options. The square brackets [] indicate that the arguments to the cal command are optional (i.e. you can leave them out). Options often (but not always) start with a -. Use the arrows to scroll and press q to quit the man page. Options can be invoked separately or together. Contrast: prompt> cal -j prompt> cal -y with: prompt> cal -jy For the two arguments to the cal program (month and year), the nesting of the brackets indicates that if there is one argument then it will be treated as a year and if there are two arguments they will be treated as a month and a year respectively. The Unix manual pages are not renowned for being well-written. They are usually terse, often to the point of incomprehensibility and it takes quite a bit of practice to be able to read them. Nevertheless, they are your first line of help. Many programs also have a builtin help option, such as: prompt> man --help Note that the above command option commenced with two hyphens, indicating that the option is a whole word, not a combination of (four) characters. You can also find out where in the filesystem the program you are running is stored with the which command: prompt> which cal The vi (and vim) editorThroughout your studies, you will be expected to edit programs and documents you have created (or downloaded) in order to correct errors, add more material, and so on. The Unix operating system provides several text editors to choose from. Which editor you choose is up to you, however, arguably one of the most popular choices is the vi editor and a newer version, with many more features, named vim. As is the case with most Unix-based editors, both of these editors will require you to learn a number of keyboard-based commands to interact with the editor. Again, mastery takes time and practice, so don't be afraid to try things! See also:
Shell aliasesA shell alias is a textual shortcut that replaces one piece of text on the command-prompt with another. We can use it here to minimise the amount of typing we need to do to compile our programs. Use you favourite editor to edit your .bash_profile startup file in your home directory. For example: prompt> vim ~/.bash_profile (The ~/ part means home directory - so this command means edit the file called .bash_profile in your home directory). [In case the part before the / appears unclear on your screen, that character is the called the "tilde" character and can can be found with the back-quote key, left of the 1 key] Add the line (even if the file is blank): alias c="clear" alias ll="ls -l" into this file. Save the file (:w in vim) and quit the editor (:q in vim). Now type: prompt> source ~/.bash_profile in the Terminal window to load these changes for this "session". For subsequent sessions (when you next log in), the system will automatically load these new aliases (think of them as new commands). Try them by typing:
prompt> c
prompt> ll
Filesystem CommandsJust as the Finder is a core component of the GUI environment, many of the commands you use most often in Unix are related to navigating and modifying the filesystem. Try the following: prompt> pwd /home/uniwa/student1/student/20000001/linux ( or /Users/yourname under macOS ) short for "present working directory", which will tell you where you currently are in the filesystem hierarchy or tree. The response returned by the pwd command is called the pathname. Initially, this should be your home directory. The pathname returned by the pwd command is an absolute pathname - it states the full name of the current working directory starting from the very top of the directory hierarchy. The top of the directory hierarchy is called the root directory (which has an absolute pathname of /). Thus, /home/ (the last / is often omitted, leaving just /home) is the name of a (sub-)directory at the next level down the hierarchy. It in turn contains a sub-directory called student.labs (the full name is therefore /home/student.labs/), which in turn contains another sub-directory called 1 (/home/student.labs/1/), and so on. The command ls allows you to find out the contents of the current working directory (ls is short for "list"). You should see the same sub-directories you saw in the Finder, including the new sub-directories you created for your CSSE units (and potentially a Downloads directory depending on what you did above. Let's first make a new directory and list the (new) contents of the current directory: prompt> mkdir cits2002 prompt> ls cits2002 Desktop Documents Downloads Library The command ls -al will show you all the files contained in the current working directory. Files starting with a . are considered hidden and can only be seen with the -a option. Change into one of your unit sub-directories by using the cd ("change directory"). For example: prompt> cd cits2002 and check that worked with the pwd command: prompt> pwd /home/uniwa/student1/student/20000001/linux/cits2002 Now create a new directory inside this directory with the mkdir ("make directory") command for your work for your first laboratory exercise: prompt> mkdir lab1 and check that its appeared with the ls command. Now open the Finder and check that you can see the same directory there too. The full name of the directory you just created is: /home/uniwa/student1/student/20000001/linux/cits2002002/lab1/ even though you created it just using the command mkdir lab1. The command: prompt> mkdir /home/uniwa/student1/student/20000001/linux/cits2002/lab1 would have achieved the same thing. This is because Unix distinguishes between an absolute pathname and the relative pathname of a file or directory. Any pathname that begins with a / describes the full name of the file right from the top of the filesystem (the root). Any other name (those not starting with a /) is treated as a pathname relative to the current working directory. A nice feature of the shell that saves typing is called filename completion. Rather than typing the full directory name, the Unix shell will complete filenames where it can. Type the following without pressing Return: prompt> cd la then press the Tab key. The shell should complete the name for you. Press the Return key and check you are now in the lab1 sub-directory. There are many other shortcut key besides the Tab key that can be used to speed up the way you enter or repeat commands. These depend on your setup. For example, you should be able to use the arrow keys to cycle back (and forward) through your previous commands. Try that now. To move up the directory hierarchy you can use .. to refer to the parent of the current directory. Try: prompt> cd .. prompt> pwd /home/uniwa/student1/student/20000001/linux/cits2002 In addition, the special symbol . (just a full-stop) refers to the current directory. Finally, the command cd with no arguments returns you to your home directory: prompt> cd prompt> pwd /home/uniwa/student1/student/20000001/linux Manipulating FilesUsing the Safari web-browser, download and save this document (save the file as linux-cc-basics.php) to your home directory (ensure you select Show Page Source in the Develop: drop-down menu). There are several commands that allow you to manipulate files. The simplest thing that you may want to do is to view/look at a file. The command cat (short for "concatenate") allows you to do this. In your terminal window, change to your home directory and have a look at the source file for this sheet: prompt> cat linux-cc-basics.php You will notice that the text flies past too fast for you to read. Some commands that let you look at a portion of a file include:
Moving files or changing their names can be accomplished by using the commands cp (copy), mv (move), and rm (remove). For example, the cp command prompt> cp linux-cc-basics.php temp makes a copy of the file called linux-cc-basics.php and names it temp. Using ls you can see both files. The mv command prompt> mv temp newtemp actually "moves" the file temp to the new file newtemp (in reality it just renames it, which is far more efficient). The file temp is no longer present in the filesystem. The rm command is used to delete files that you no longer need. This allows us to save disk space and avoid cluttered directories. The command: prompt> rm newtemp will remove this file from your directory. You can give rm several file names at once and all the files will be removed. If you want to get rid of a directory, use the command rmdir, but note that the directory must be empty in order for it to be removed. An Introduction to the C CompilerA compiler is a program responsible for translating high-level programming language instructions (such as human readable C source code) into machine-executable instructions. Under both the Linux and macOS operating systems the C compiler is named cc, and may be invoked from the command-line (the shell) by just typing cc at the prompt. NOTE: you will likely read in a textbook, or online, that the native C compiler on Linux is actually invoked with gcc - standing for the GNU C Compiler. However, on macOS, the native C compiler is named clang. To simplify things, both systems provide the command cc, which invokes the native C compiler for that system. We'll just use cc in all following examples. (And another complication, is that we can install gcc on macOS, and clang on Linux, but we won't need to!) It's been suggested that you create a new directory for this unit, named cits2002. Change into that directory, and then create another (sub)directory named lab1. You should get into the practice of maintaining a well-structured directory hierarchy - it will help you organise and separate your work into logical divisions. From your web-browser download and save a copy of the simple C program named rotate.c. Your browser will likely save this file to your Desktop, so you may need to move it to your new cits2002/lab1 directory. TAKE CARE that your web-browser does not add the extension .txt to the filename - if it does, you'll need to rename it using the mv command. rot13 is an old Internet term used to described ciphering a piece of text by replacing each character in the text with the character 13 positions further along the character sequence, allowing for wrap-around. So, for example, "rot13-ing" the text hello produces the text uryyb, as character h is converted to the character u (13 characters beyond h), the character e is converted to the character r, and so on. For the first part of this labsheet, you do not need to know how this program works. Basic Compilation and ExecutionIn CITS2002 we'll be using the C11 standard, which is slightly different to the earlier C99 standard, both of which are vastly different to the C89 (or ANSI-C) standard. In general, newer versions of the standard are backward compatible. The C11 and C99 standards are very similar [a summary of differences], and we'll not have particular need to use C11 features until much later in the unit. However, now is a good time to get into the practice of using C11. While many contemporary C compilers support C11, many also still provide C99 as their default, so we need to know how to select the desired standard.
Ensure your copy of the rotate.c file is located in your working directory by typing ls at the command prompt: prompt> ls rotate.c (and, over time, other files too). Compile your copy of rotate.c file by typing: prompt> cc -o rotate rotate.c at the command prompt. Assuming everything went successfully (and it should have!), you should now see two files in your directory (type ls again at the command prompt): prompt> ls rotate rotate.c Depending on your setup, you might see an asterisk immediately following the rotate file that indicates that file is executable. Even if you don't see an asterisk, the rotate file is indeed executable, meaning we can finally run it. Consider what has happened here when we compiled our rotate.c program with the cc compiler - the compiler has read our program from disk (from our text file named rotate.c holding the C source code), parsed (checked) it for errors, and translated it to machine-executable instructionsq (a new file named rotate. ExecutionLet's now execute the program at the command-prompt by typing: prompt> ./rotate hello The first part following the prompt is the name of the executable (the ./ part indicates program is found in the current directory). The second and subsequent parts following the prompt form the arguments to the program. In this case, we are supplying one argument to the rotate program - the text hello. Executing the command as detailed above should yield the following: prompt> ./rotate hello uryyb prompt> ./rotate uryyb hello meaning our executable generated the output uryyb in this case of the text argument hello. Try other arguments, such as your name, to ensure the program is behaving as expected. The cc -o <name> OptionLet's now explore the different arguments we supplied to the cc compiler when we compiled our program. Clearly, the last argument to cc was the name of our program. But what about the other arguments? The -o rotate part of the compiler command determined the name of the executable (in our case rotate). We can name the executable whatever we want, so typing: prompt> cc -o blah rotate.c at the command prompt, followed by ls should produce the following listing: prompt> ls blah rotate rotate.c We now have two (similar) executables (blah and rotate) that do the same thing. Let's delete these executables by typing: prompt> rm blah rotate at the command prompt. Typing ls again should reveal we are back to one single file - our rotate.c program: prompt> ls rotate.c The -o <name> argument(s) to the compiler are actually optional. If we omit them, the compiler still generates an executable, but gives the executable a default name called a.out. Try this now by typing: prompt> cc rotate.c and you should see an executable called a.out along with the rot.c program when you type ls at the command prompt: prompt> ls a.out rotate.c Generating executables with the default name is bad practice and gets confusing (as you can only have one a.out file per directory), so you should always supply a name for the executable with the -o <name> option. Delete the a.out executable with the rm command.
Other important C compiler optionsOur goal in this unit is to develop correct, portable, and robust C programs. We can approach this goal by conforming to programming standards, and having the (very knowledgable) C compiler perform as many checks are possible.From here on, in laboratory and project work, we'll compile all of our C11 programs with a rigorous set of command-line options, as in this example: prompt> cc -std=c11 -Wall -Werror -o rotate rotate.c From left-to-right, these additional command-line options are:
Modern C compilers can support a huge number of possible warnings - gcc's Options to Request or Suppress Warnings, and Diagnostic flags in Clang. Fortunately, most are simply requested by the single -Wall option. A shell alias for compilingA shell alias is a textual shortcut that replaces one piece of text on the command-prompt with another. We can use it here to minimise the amount of typing we need to do to compile our programs. Use you favourite editor to edit your .bash_profile startup file in your home directory. For example: prompt> vim ~/.bash_profile (The ~/ part means home directory - so this command means edit the file called .bash_profile in your home directory). [In case the part before the / appears unclear on your screen, that character is the called the "tilde" character and can can be found with the back-quote key, left of the 1 key] Add the line (even if the file is blank): alias mycc="cc -std=c11 -Wall -Werror" into this file. Save the file (:w in vim) and quit the editor (:q in vim). Now type: prompt> source ~/.bash_profile in the Terminal window to load these changes for this "session". For subsequent sessions (when you next log in), the system will automatically load this change. This creates a textual alias called mycc that you can now use to compile your programs with (when the computer sees the command mycc, it will be replaced by the command cc -std=c11 -Wall -Werror). Try it by typing: prompt> mycc -o rotate rotate.c and see that the compilation process still works. Notice that you still need to provide the -o <name> arguments to determine the name of the executable, but all the other flags have now been captured in the mycc alias. |
|
The University of Western Australia Computer Science and Software Engineering CRICOS Code: 00126G |
 |
Presented by [email protected] |